Solar Panel Mounting and Roof Composition

Electrical issues, both 12 volt and 120 volt
Post Reply
Mgittrich
Seasoned Traveler
Posts: 103
Joined: Wed Jul 24, 2013 9:01 pm
B190 Year: 1993
WBCCI: 0

Solar Panel Mounting and Roof Composition

Post by Mgittrich »

As part of an electrical system upgrade I'm doing on my 93 B190 I'm looking at adding a solar system to keep my 3 100amp batteries charged. I think I will consume 50-75 amp/hrs per day and believe the following configuration should be ample to keep the batteries charged.

2 - Kyocera KD140 140 watt 12v nominal panels
1 - Blue Sky 3000i MPPT solar controller
1 - Blue Sea 285 25amp Circuit Breaker between the solar panels and the solar controller
1 - Blue Sea 285 30amp Circuit Breaker between the solar controller and the battery bank switch

The solar upgrade wiring diagram looks like this:
Solar Upgrade Wiring Diagram HD
image.jpg (112.53 KiB) Viewed 15011 times
My concern is how to mount the solar panels on the roof without having them ripped off while driving 70mph into a 40mph head wind. I will not be tilting these panels as the b190 is in storage during the winter and I do not like climbing on top of the roof.

My research indicates there are 2 methods used for mounting the solar panels flat on the roof. On involves using "z" brackets with screws and the other involves using "z" brackets with 3M VHB tape.

So I'm hoping that some of you have done this and can provide some advice on which way to go and how many brackets and type of screws they used and any recommendation regarding which brackets they used.

I'm also interested in the roof composition. I believe it's fiberglass over plywood and I was hoping some of you might know the thickness of the fiberglass and plywood layers and whether a cavity exists between the bottom of the plywood and the interior ceiling.

I appreciate you sharing any knowledge about this and feedback you might have.

Mike
Last edited by Mgittrich on Fri Dec 13, 2013 1:22 pm, edited 2 times in total.
User avatar
Kentuckian
Seasoned Traveler
Posts: 346
Joined: Sun Sep 30, 2012 3:52 pm
B190 Year: 1993
WBCCI: 0
Location: Kentucky, USA

Re: Solar Panel Mounting and Roof Composition

Post by Kentuckian »

Hi Mike,

At first glance, your system sounds great!

I installed a single 100watt panel on the roof of my '93 B190. I can't advise you on brackets because I used a urethane rubber adhesive to glue the mounting frame to the roof. I didn't want to risk weaken the roof with drilled holes and wanted to avoid potential water leak sites. My panel is mounted cross wise just after the roof drops down and just in front of the air conditioner. It has been working great. My mount is tall enough to avoid shadows from the AC or roof vent but still just below the roof line of the front of the B190.

I replaced my exhuast fan but unfortunately I do not remember the precise construction of the roof. Yes there is a cavity between the fiberglass roof and the interior ceiling. I suggest you consider removing the interior trim ring on your ceiling exhuast fan. Depending on your model this might let you get a look at the cross section of the roof.

Kentuckian
1993 Airstream B190
User avatar
Alaskan
Site Admin
Posts: 814
Joined: Wed Mar 21, 2007 12:00 am
B190 Year: 1999
WBCCI: 0
Location: Alaska and Washington

Re: Solar Panel Mounting and Roof Composition

Post by Alaskan »

I like Kentuckian's idea of using an adhesive product of some kind...there are many and the one I like is
3M 5200 Quick Dry....its really a marine product...most West Marine stores and Ace Hardware stores have it. Once it sets up it will not release in any way... !

Scuff the area well (sandpaper or coarse Scotch Bright) where you use an adhesive to ensue good clean bondage
results.
kitemanks
Weekend Camper
Posts: 28
Joined: Wed Mar 27, 2013 2:42 pm
B190 Year: 1994
WBCCI: 0

Re: Solar Panel Mounting and Roof Composition

Post by kitemanks »

The construction of the roof consists of wooden spars or ribs if you like going across from side to side underneath the fiberglass. There is also a bit of expand o foam in there as well. I wouldn't worry about smaller holes effecting the strength of the roof. Water could be a concern but bolting it down would make a solid connection.
User avatar
lido14co
Seasoned Traveler
Posts: 259
Joined: Wed Apr 25, 2012 1:12 pm
B190 Year: 1992
WBCCI: 0
Location: Los Osos, CA

Re: Solar Panel Mounting and Roof Composition

Post by lido14co »

Did you get your panels installed? If so, how did you wind up mounting them? Also, did you use the existing prewired solar panel leads?
Thanks,
Cliff


Sent from my iPad using Tapatalk
Mgittrich
Seasoned Traveler
Posts: 103
Joined: Wed Jul 24, 2013 9:01 pm
B190 Year: 1993
WBCCI: 0

Re: Solar Panel Mounting and Roof Composition

Post by Mgittrich »

Cliff,

My 93 B190 is stored in a nice warm cave during the winter so the solar upgrade I'm doing won't be completed until mid May. I've been doing a lot of research on the best way to mount the solar panels and will use one of these products. I don't want to put holes in the roof since the fiberglass is around 1/4" with a insulated void underneath and structural ribs interspersed across the top.

I did see some mounts from Samlex, http://www.batterystuff.com/solar-charg ... /sm-5.html, with some rubber inserts and 1" screws that expand underneath the fiberglass and seal it from moisture which looked like a pretty good approach if you wanted to use screws. I think this combined with some this marine adhesive, http://www.amazon.com/gp/product/B0065H ... UTF8&psc=1, on the bottom of the feet topped with Dicor would also be a good approach. This is probably massive overkill and either the screws or marine adhesive alone is all you really need.

I think I will probably use Stickey Feet, https://rvsolarstore.com/index.php?rout ... uct_id=112, topped with Dicor. I will probably use 8 feet per panel. These use 3M VHB tape which creates a permanent bond which cannot be removed.

Another approach would be to create your own mounts with angle iron and mount to the roof with either screws, adhesive or VHB tape as described above.

I will use the existing pre wired solar connection to avoid trying to figure out how to pull the wire from the roof down to the solar controller I'm using which is mounted next to the converter. The 10ga wire is probably sufficient for the distance of the run. However, if you're going to pull new wire I'd probably use wire in the 4-6awg range. I've seen some posts on this forum where someone tried to pull larger wire using the existing wire but found that this was not possible.

I hope this helps.

Mike
User avatar
lido14co
Seasoned Traveler
Posts: 259
Joined: Wed Apr 25, 2012 1:12 pm
B190 Year: 1992
WBCCI: 0
Location: Los Osos, CA

Re: Solar Panel Mounting and Roof Composition

Post by lido14co »

Thanks Mike. Good luck with the install in May.


Sent from my iPad using Tapatalk
Mgittrich
Seasoned Traveler
Posts: 103
Joined: Wed Jul 24, 2013 9:01 pm
B190 Year: 1993
WBCCI: 0

Re: Solar Panel Mounting and Roof Composition

Post by Mgittrich »

I'm updating this thread to reflect exactly what I ended up doing to install the solar panels on the roof of the B190.

The installation of the 2 Kyocera (140 watt) solar panels have been completed and I wanted to update this thread with some pictures of the upgrades and a last minute change to the solar panel installation.

By way of explanation the original installation approach consisted of using Stickyfeet from http://rvsolarstore.com/ . Mounted directly to the fiberglass top of the B190. No screwing into the roof of the RV. If you look at the http://rvsolarstore.com/ website they indicate that 6 Stickyfeet are sufficient for mounting solar panels under 150 watts. I was a little concerned that this might not be sufficient so I decided to go with 10 feet per panel arranged as illustrated in this drawing:

Image

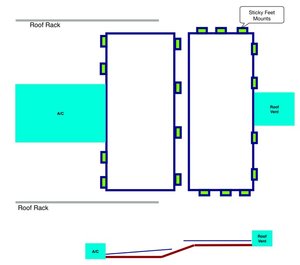
With this approach I ended up with one tilted panel and one flat. Not a big deal. But as I was looking at the roof I noticed a slight crown to facilitate rain runoff and when coupled with the slant between the AC and the roof vent I was concerned about the installation since once you place the Stickyfeet on the roof they cannot be removed.

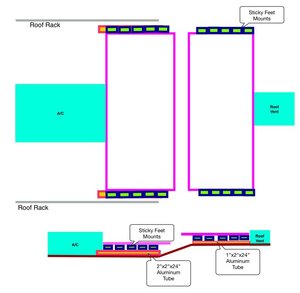
So I thought about ways to install both panels flat and thought that placing a hollow square aluminum tube between the Stickyfeet and the roof could be used to raise the rear panel enough to take the slant out of play. So I looked at the rvsolarstore website to see which specific 3M VHB tape they used for the Stickyfeet since there are many to choose from. Rvsolarstore's website does not say specifically which formulation they use so I emailed their product support with the approach I just described and asked. They said this was proprietary information and would not divulge it even though I had already purchased 20 Stickyfeet from them.

So I decided to contact 3M Technical Support to get their recommendation. They indicated that they would NOT recommend using VHB tape for this purpose and said that if I were I should consider the amount of VHB tape needed. They recommend 4 sq inches of tape per pound for a static sheer load, think picture hanging on a wall. Solar panels on an RV would require more tape since this is a dynamic sheer load subject to wind moving across the the top of the RV. If you do the math, 10 Stickyfeet have 30 sq inches of adhesive and the panels way about 30 lbs apiece. This information raised a lot of red flags so I asked them what would work. 3M Technical Support recommend an industrial structural epoxy, specifically DP100 Plus Clear, DP110 or DP125. For the most part these products are very similar with different work and cure times. They also said that as an individual consumer obtaining these products in small quantities might be difficult since they are designed for industrial applications and required special applicators to mix and apply the epoxy to the substrate. These products are also not available through Homedepot or Lowes. I did find them on Amazon for about $25 per 50ml duopacks.

Not deterred by this I thought 3M DP110, 10 minute work time and 48 hour cure time, was what I needed. I found this product on Ebay being sold for $100 for a case of 12 50ml duopacks with mixing nozzles and an applicator for another $40. Not cheap but worth the piece of mind

So now armed with a workable approach I modified the installation design and the approach for mounting the panels to the aluminum bars while still using the Stickyfeet I already had. Here's the drawings I used to convey the approach to the people at the RV service shop doing the installation.

Image

Image

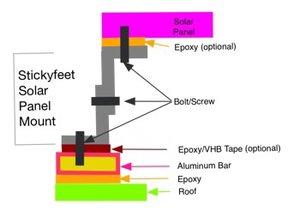
The installers used 6 50ml duopacks during the installation process. Since I had lost confidence in the VHB tape I also had the installers screw the Stickyfeet to the aluminum tubes through the adhered VHB tape.

The installation also used the pre-existing B190 solar panel wiring and some MC4 cables and MC4 parallel connectors to wire the panels to the junction box on the roof.

Here's a couple of pics of the completed installation:

Image

Image

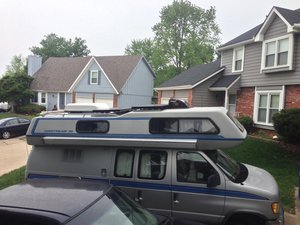
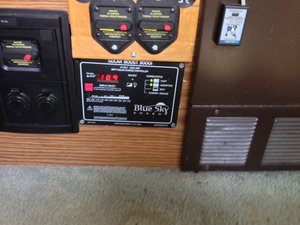
I'm sure you're also interested in the output of this setup. During full sun in the middle of the day with batteries needing to be charged this setup will put out between 18-20 amps per hour to the batteries.

Image

I hope this helps anyone looking to do these modifications.

Mike
Last edited by Mgittrich on Wed May 21, 2014 7:24 pm, edited 1 time in total.
User avatar
lido14co
Seasoned Traveler
Posts: 259
Joined: Wed Apr 25, 2012 1:12 pm
B190 Year: 1992
WBCCI: 0
Location: Los Osos, CA

Re: Solar Panel Mounting and Roof Composition

Post by lido14co »

A fine post Mike. Congrats on the upgrade. You should have plenty of power to stay off grid until you run out of water! Have a blast this summer.


Cliff
Post Reply