Electrical system background
Posted: Wed Dec 28, 2011 12:12 pm
Many people new to campers are confused by the multiple electrical systems. This tries to clarify it...
The electrical systems in our B190s is confusing and somewhat complicated. In this article I attempt to break it down.
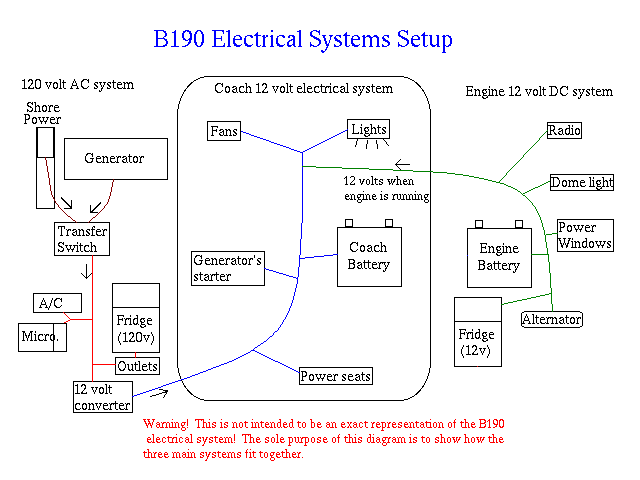
First, understand there are three electrical systems. They are:
1. The 120 volt AC system, like your home has
2. The engine's 12 volt DC system, like your car has
3. The coach's 12 volt DC system
The 120 volt AC System
This system contains the rooftop air conditioner, the fridge (in 120 volt mode), the power outlets, the microwave, and the convertor for the coach's 12 volt system. That's it.
It is somewhat complicated by the fact that there are two sources of electricity in most of our B190s, with a third one that might've been installed by a former owner:
1. "Shore power" - the 120 volt power cord that you plug in when at a campsite or at home.
2. Generator - if your camper is equipped with one
3. Inverter - takes 12 volt power, usually from the coach battery (see the coach's 12 volt system, below), and inverts it to 120 volt
If you have a generator, there is an automatic transfer switch installed that switches to generator power when the generator is running (even if you are still plugged in to shore power). After you start the generator and it stabilizes and starts producing electricity, you'll probably hear the transfer switch produce a loud "click" as it switches over.
While 120 volt is available, as mentioned above, the converter is powered, so you'll be able to use all of the items connected to the coach's 12 volt DC system. Note the starter for the generator is connected to the coach's 12 volt DC system, too.
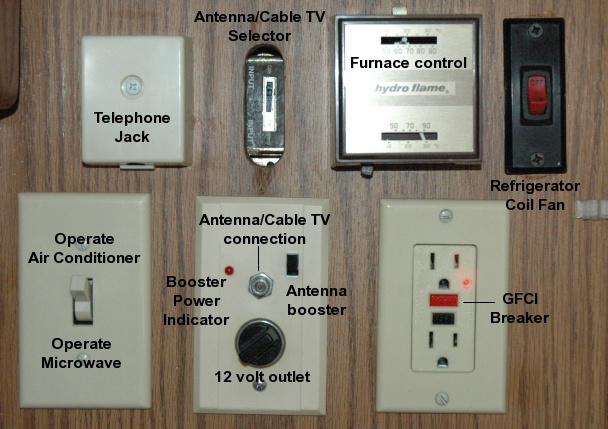
To detect if you have an active 120 volt AC power source, mine has a small light in the GFCI power outlet. It should be lit when 120 volt power is available. (See picture - the light is just above the red GFCI breaker button.) If yours doesn't have that, the best solution might be just to plug in a lamp or other known working device.
The engine's 12 volt DC system
This is essentially the same as the 12 volt DC system in a car. This provides power for the engine's starter, lights, radio, etc. This system will usually have a regular car battery under the hood. (On mine, it's the passenger-side battery.) This system also supplies the DC mode of the fridge when the engine is running.
The coach's 12 volt DC system
Here's where things get interesting. All of the interior lighting and fans run on this 12 volt DC system. Sources of power for the coach 12 volt system are:
1. The 120 volt AC system, via the power converter under the couch.
2. The alternator on the vehicle's engine, if the engine is running.
3. The coach battery
4. Solar panels, if equipped
It's important to note that when the engine is running, the two 12 volt DC systems are connected together via a selenoid mounted underhood (which you may hear click when you turn the ignition to "RUN"). Thus, even if your deep cycle battery is run down, running the engine will supply 12 volt power to the interior lights, fans, and the generator's starter.
This is especially useful when starting the generator if the coach battery is weak - just start the camper's engine, then start the generator.
Charging the coach battery
The coach battery is charged whenever 120 volt AC power is available, the engine is running, or the solar panels are in sunlight. However, the engine's battery is only charged by the alternator; the converter does not charge the engine battery.
You can check the condition of the coach battery's charge using the monitor. However, note that while the battery is being charged (that is, the engine is running, or you have a 120 volt power source available), the indicator should show "charging", regardless of the battery's actual charge. To accurately gauge the condition of the coach battery, shut off all 120 volt sources and/or the engine, then check the monitor. Note batteries can have a 'surface charge' that means you might get a lower reading 20 minutes after you shut off the charging sources.
What are the batteries?
The engine battery is a standard car battery. The coach battery should be a deep cycle type. Deep cycle batteries are more resistant to the damaging effects of deep discharges, whereas a couple deep discharges of a regular car battery can kill it. The cheaper versions are wet cells that require monitoring and refilling with distilled water on occasion. Better batteries are the gel-type or AGM, which are sealed, but are also more sensitive to being overcharged.
(Added 3/19/21) Lithium batteries are also widely available now. As of this writing they're still fairly expensive, and you definitely must have a converter that's compatible with them (most are not), but the power capacity and lifetime they offer mean we'll probably all be using them within a few years. Also note if you have a solar system, you'll want the controller to be lithium-compatible as well. If you're replacing your converter anyway, there are some that are compatible with both traditional (wet cell and AGM) and lithium batteries, so consider that option to future-proof your B190.
Rough Wiring Diagram
The electrical systems in our B190s is confusing and somewhat complicated. In this article I attempt to break it down.
First, understand there are three electrical systems. They are:
1. The 120 volt AC system, like your home has
2. The engine's 12 volt DC system, like your car has
3. The coach's 12 volt DC system
The 120 volt AC System
This system contains the rooftop air conditioner, the fridge (in 120 volt mode), the power outlets, the microwave, and the convertor for the coach's 12 volt system. That's it.
It is somewhat complicated by the fact that there are two sources of electricity in most of our B190s, with a third one that might've been installed by a former owner:
1. "Shore power" - the 120 volt power cord that you plug in when at a campsite or at home.
2. Generator - if your camper is equipped with one
3. Inverter - takes 12 volt power, usually from the coach battery (see the coach's 12 volt system, below), and inverts it to 120 volt
If you have a generator, there is an automatic transfer switch installed that switches to generator power when the generator is running (even if you are still plugged in to shore power). After you start the generator and it stabilizes and starts producing electricity, you'll probably hear the transfer switch produce a loud "click" as it switches over.
While 120 volt is available, as mentioned above, the converter is powered, so you'll be able to use all of the items connected to the coach's 12 volt DC system. Note the starter for the generator is connected to the coach's 12 volt DC system, too.
To detect if you have an active 120 volt AC power source, mine has a small light in the GFCI power outlet. It should be lit when 120 volt power is available. (See picture - the light is just above the red GFCI breaker button.) If yours doesn't have that, the best solution might be just to plug in a lamp or other known working device.
The engine's 12 volt DC system
This is essentially the same as the 12 volt DC system in a car. This provides power for the engine's starter, lights, radio, etc. This system will usually have a regular car battery under the hood. (On mine, it's the passenger-side battery.) This system also supplies the DC mode of the fridge when the engine is running.
The coach's 12 volt DC system
Here's where things get interesting. All of the interior lighting and fans run on this 12 volt DC system. Sources of power for the coach 12 volt system are:
1. The 120 volt AC system, via the power converter under the couch.
2. The alternator on the vehicle's engine, if the engine is running.
3. The coach battery
4. Solar panels, if equipped
It's important to note that when the engine is running, the two 12 volt DC systems are connected together via a selenoid mounted underhood (which you may hear click when you turn the ignition to "RUN"). Thus, even if your deep cycle battery is run down, running the engine will supply 12 volt power to the interior lights, fans, and the generator's starter.
This is especially useful when starting the generator if the coach battery is weak - just start the camper's engine, then start the generator.
Charging the coach battery
The coach battery is charged whenever 120 volt AC power is available, the engine is running, or the solar panels are in sunlight. However, the engine's battery is only charged by the alternator; the converter does not charge the engine battery.
You can check the condition of the coach battery's charge using the monitor. However, note that while the battery is being charged (that is, the engine is running, or you have a 120 volt power source available), the indicator should show "charging", regardless of the battery's actual charge. To accurately gauge the condition of the coach battery, shut off all 120 volt sources and/or the engine, then check the monitor. Note batteries can have a 'surface charge' that means you might get a lower reading 20 minutes after you shut off the charging sources.
What are the batteries?
The engine battery is a standard car battery. The coach battery should be a deep cycle type. Deep cycle batteries are more resistant to the damaging effects of deep discharges, whereas a couple deep discharges of a regular car battery can kill it. The cheaper versions are wet cells that require monitoring and refilling with distilled water on occasion. Better batteries are the gel-type or AGM, which are sealed, but are also more sensitive to being overcharged.
(Added 3/19/21) Lithium batteries are also widely available now. As of this writing they're still fairly expensive, and you definitely must have a converter that's compatible with them (most are not), but the power capacity and lifetime they offer mean we'll probably all be using them within a few years. Also note if you have a solar system, you'll want the controller to be lithium-compatible as well. If you're replacing your converter anyway, there are some that are compatible with both traditional (wet cell and AGM) and lithium batteries, so consider that option to future-proof your B190.
Rough Wiring Diagram