Question for those familiar with the 92-96's with the weird front battery.
We bought a 51 size yellow optima for the front battery(aux) since a regular battery from Ford seemed like a waste of time and money.
That said, Diane and I spend most of our time on the Road less traveled and tend to not use campgrounds so battery power is priceless to us.
My question(long winded as I am) I want to put a size 34 optima yellow battery in as well. Since the inverter deal is under the side seat and the drawer under there is a pain in the keister, I thought I would use this space for the extra battery as it is easier to wire. Or... should I put it in the closet area? Pros and Cons. and helpful hints on wiring this puppy into the system would be helpful.
Installing an AGM battery on our 93- Sofa or Closet?
-
Alaskan

- Site Admin
- Posts: 814
- Joined: Wed Mar 21, 2007 12:00 am
- B190 Year: 1999
- WBCCI: 0
- Location: Alaska and Washington
Robert....stay tuned..... its a fish and berry canning week before the snow flies.. !
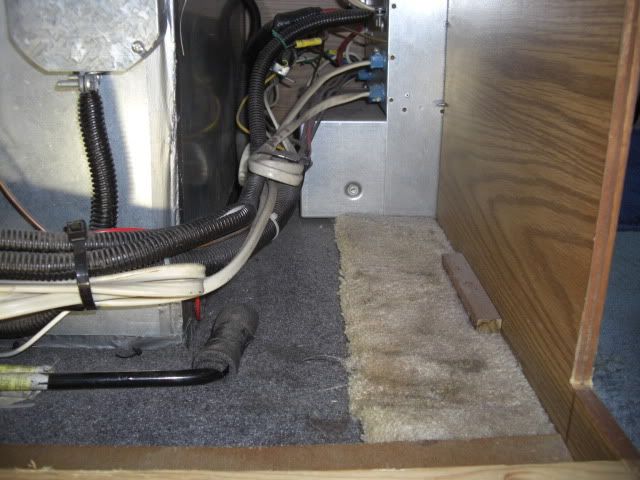
Have you looked under the couch, very very limited space there...not sure there would be enough room to be found for a second house-battery....93 has the single large drawer under the couch as I remember, to the right of that in the gen box, between the gen box and the front of the couch enclosure there is a bit of space, not sure if there is enough for a battery....btw, where ever you put a battery inside the rig be sure to put it in a marine plastic box and best to use a sealed no maintenance battery.
Just to note....running cables all the way back to a closet-mounted battery wouldn't be an option IMO
The 97 and newer rigs did have the house battery mounted under-the vans-floor in the rear...thats why it was easy for me to add in a second house battery above the original.
http://b190.com/modules.php?name=Forums ... opic&t=487
-
weekender

- Seasoned Traveler
- Posts: 162
- Joined: Mon Aug 25, 2008 12:00 am
- B190 Year: 1993
- WBCCI: 0
- Location: Northampton MA
If you are willing to ditch the drawer under the couch on a 93, there is more than enough room under the couch. I have not gone the route of putting another battery in my van, but I have gotten rid of the drawer. It is one of the best modifications I have done. The process is pretty easy-- the oak drawer front comes off if you are careful. Simply rotating the oak front 180 degrees and mounting 2 hinges along the bottom. It works very similar to the cabinet that exists under the refrigerator. In reality, there is actually a lot more space under the sofa without the drawer.
Can't speak about how easy it would be to do the battery rewiring-- but there is plenty of room under there.
Steve
Can't speak about how easy it would be to do the battery rewiring-- but there is plenty of room under there.
Steve
-
RobertL
- Weekend Camper
- Posts: 90
- Joined: Sat Aug 21, 2010 12:00 am
- B190 Year: 1993
- WBCCI: 0
- Location: Nevada
Got the drawer out and am in the process of retrofitting area, Thanks Weekender for the tip on the drawer- It will make a good door face.
Lots of room- I will take the mdf from the drawer and use it to make a barrier on the right side to protect the electricals.
There will be plenty of room under there to place a battery or two and still have loads of storage for other stuff.
Now I just have to pour over the wiring diagrams and figure the best tie in point for the battery.
-
Alaskan
- Site Admin
- Posts: 814
- Joined: Wed Mar 21, 2007 12:00 am
- B190 Year: 1999
- WBCCI: 0
- Location: Alaska and Washington
I'd probably make a plywood box with a secure top for that application as the black-plastic marine battery boxes have 4 locations where the cables can exit, making these boxes pretty much open really...which could result in having a battery acid odor omitted into the rig...
Below that carpet is plywood so attaching a box would be quite easy.
Below that carpet is plywood so attaching a box would be quite easy.
I installed an AGM battery battery under the couch in my 1990 b-van.
There was just enough room for a group 27 size battery tray to fit there up against the baseboard of the couch. I bough the tray from Amazon.com, and it came with a velcro strap to hold the battery in place.
Under my couch looks a lot like Alaskan's picture except that I also have the plastic duct for the heater output that goes to the bathroom. I set one edge of the battery tray against the strip of wood on the inside of the couch baseboard, and attached plywood to the other side to keep it level then just screwed it into the floor.
I thought I would have to install an access panel to put the battery under the couch, but there was just enough from for the battery to slide in with the couch front lifted.
Wiring it in was just a matter of hooking it up to the 12 volt fuse panel. No need to drill any holes in the van.
-
RobertL
- Weekend Camper
- Posts: 90
- Joined: Sat Aug 21, 2010 12:00 am
- B190 Year: 1993
- WBCCI: 0
- Location: Nevada
Question for "On The Road" about how to connect ba
Please Help. as I do not want to blow something up.
I have the sofa drawer fully converted to a cabinet now, thanks for the pointers.
My new battery will be here by Monday and I have the tie down, cables, disconnect switch at he ready.
How do I tie this into the 12 volt under the cabinet?
I know in the top right corner of the inverter there is a feed, but is this regulated or unregulated 12 volt, as is this the right place to tie in?
ok, based on my 1990 here's what I think you should be doing assuming you are removing the house battery from the engine compartment and replacing it with your AGM battery under the couch.
1) Remove the house battery from the engine compartment
2) Remove the "+" lead that attached to the house battery
In my van this is a short cable that goes to a bolt on the battery isolator.
3) You may want to remove the "-" lead that attached the house battery to the chassis, but I don't think it matters.
4) Attach the "+" and "-" of your battery to the 12 volt fuse panel in *parallel* with the current cables that go to the engine compartment.
- The reason for doing this in parallel is so that the alternator will still charge your house battery when the engine is running, and so that your house battery will be grounded to the chassis.
If you do not hook it up in parallel the alternator will not charge your battery, and it is possible some of the accessories won't work unless you ground your battery to the chassis.
For attaching your battery to the fuse panel, I would use a 10 gauge wire, and put a 30 amp fuse on the "+" wire.
Just as a disclaimer - I'm no expert, and I'm writing this at 3:00am.
Good luck! Also I found a volt meter to be very helpful when doing this to verify I was hooking things up properly.
-
Alaskan
- Site Admin
- Posts: 814
- Joined: Wed Mar 21, 2007 12:00 am
- B190 Year: 1999
- WBCCI: 0
- Location: Alaska and Washington
Thanks OTR....
I'd much prefer to keep the house battery up front and hook the added battery into the system to greatly increase overall capacity...
When I added a house battery to my 1997 (which was much easier as the house battery is rear-mounted) I connected them in series, therefore doubling capacity.
I'd much prefer to keep the house battery up front and hook the added battery into the system to greatly increase overall capacity...
When I added a house battery to my 1997 (which was much easier as the house battery is rear-mounted) I connected them in series, therefore doubling capacity.
Last edited by Alaskan on Wed Jun 01, 2011 1:20 pm, edited 1 time in total.
-
RobertL
- Weekend Camper
- Posts: 90
- Joined: Sat Aug 21, 2010 12:00 am
- B190 Year: 1993
- WBCCI: 0
- Location: Nevada
I am keeping the coach battery in the front (yellow top optima group 51) and adding a 2nd to the coach area. A tray has been secured to the floor, which has a tie down to keep the battery snug.
The battery is a blue top optima 34 deep cycle agm with dual posts and a nice little cover to keep the leads from getting exposed to anything or anybody.
After reviewing all the notes from you gentlemen and the schematic on my fuse panel, I am going to do the following when my new battery arrives:
1- make sure I am not plugged into any power source.
2- disconnect the positive lead on the front coach battery.
3- connect a 10 gauge red wire with an in-line 15 amp fuse to the positive terminal on my fuse panel.
4- connect the other end to my new battery.
5- connect a 10 gauge black wire to the negative terminal on my fuse panel.
6- connect the positive lead on the front coach battery.
If anything here is dubious or potentially dangerous please reply.
Thanks
-
skater

- Site Admin
- Posts: 2570
- Joined: Thu Mar 08, 2007 1:00 am
- B190 Year: 1991
- WBCCI: 13270
- Location: Annapolis, MD
This sounds good to me!RobertL wrote:I am keeping the coach battery in the front (yellow top optima group 51) and adding a 2nd to the coach area. A tray has been secured to the floor, which has a tie down to keep the battery snug.
The battery is a blue top optima 34 deep cycle agm with dual posts and a nice little cover to keep the leads from getting exposed to anything or anybody.
After reviewing all the notes from you gentlemen and the schematic on my fuse panel, I am going to do the following when my new battery arrives:
1- make sure I am not plugged into any power source.
2- disconnect the positive lead on the front coach battery.
3- connect a 10 gauge red wire with an in-line 15 amp fuse to the positive terminal on my fuse panel.
4- connect the other end to my new battery.
5- connect a 10 gauge black wire to the negative terminal on my fuse panel.
6- connect the positive lead on the front coach battery.
If anything here is dubious or potentially dangerous please reply.
Thanks
1991 Airstream B190 - bought, 2005; sold, 2011; bought 2017
1995 Airstream Excella 30' trailer
WBCCI #13270, Washington, DC Unit
1995 Airstream Excella 30' trailer
WBCCI #13270, Washington, DC Unit