Replacing the converter
Posted: Wed Dec 28, 2011 11:56 am
My power converter was dying quickly last season. For one trip where I didn't have a city water connection, I found that when the water pump kicked on, the radio would shut off because of low voltage. I checked the voltage a couple weeks ago with just the Fantastic Fan running (at its lowest speed) and the radio on, and it was around 11 volts. Definitely too low. Also, my battery was cooked by the converter and was completely worthless. (To ensure it wasn't just the battery, I disconnected the battery when I did the voltage check.)
After doing some research, I settled on the Progress Dynamics Inteli-Power 9200 series 60 amp converter model PD9260C. I ordered it from Best Converter because they (a) include the optional remote pendant, and (b) someone from the company has an Airstream himself and hangs out on the AIR Forums site providing advice, and in fact answered my question about whether this unit would fit in the original spot (it does, barely).
Note the original converter is 32 amps, and the new one is 60 amps. 60 amps is probably overkill for an RV the size of the B190 but I know I might be adding a number of 12-volt accessories later so I figured the extra headroom would be useful. Also I think the 60 amp unit actually fits better than the 45 amp unit would, because the 45 amp unit is taller. For the supply side of things, the 120 volt circuit the converter is on is rated for 20 amps, and the 60 amp converter won't use anywhere near that - at most it comes out to about 8 amps, and that's only if you're using 60 amps of DC power somehow.
Also, I ordered the fuse panel kit from Best Converter because the old fuse panel only filters the power for certain circuits, not all of them. Also, this would allow me to split things into multiple circuits more easily if I ever wish to (in particular, I'd like to run the radio and CB on their own circuit).
My new battery is an Optima Blue Top. I went with Optima because they have a pretty decent reputation, and because I wanted a sealed cell that required no maintenance, and because they were readily available locally.
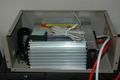
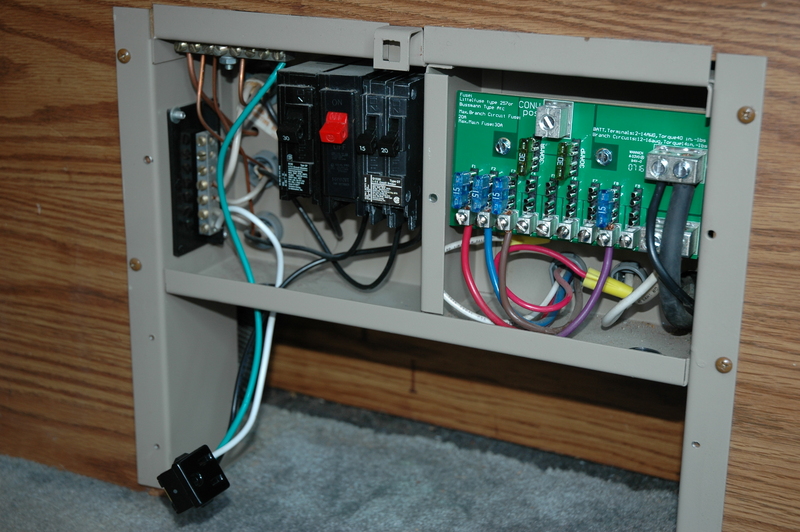
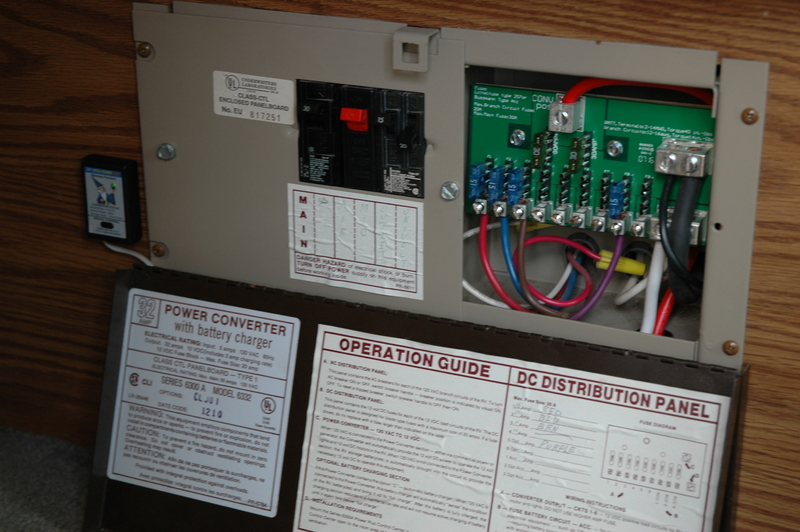
On to the show. First, here's how it looked before I started:
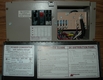 (Click on pictures for larger versions.)
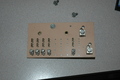
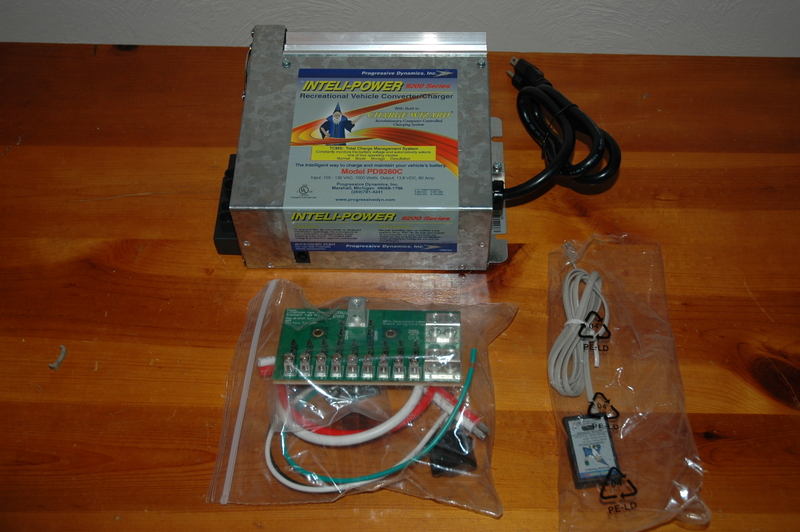
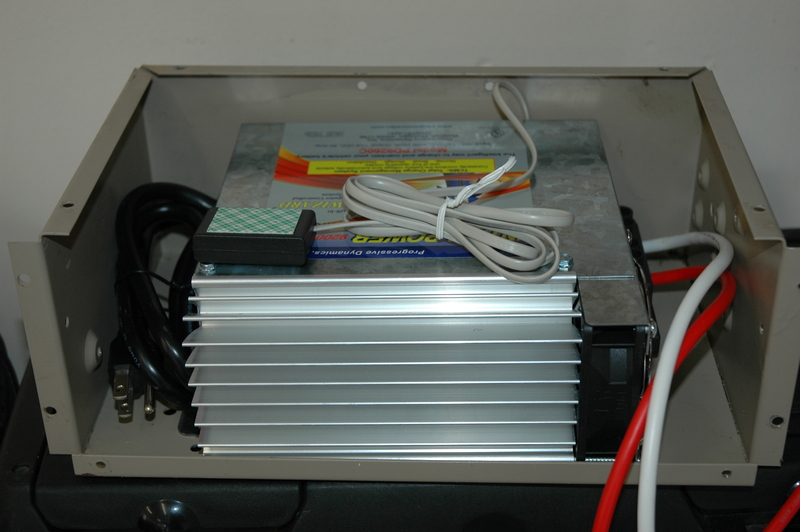
And here's a shot of the new components:

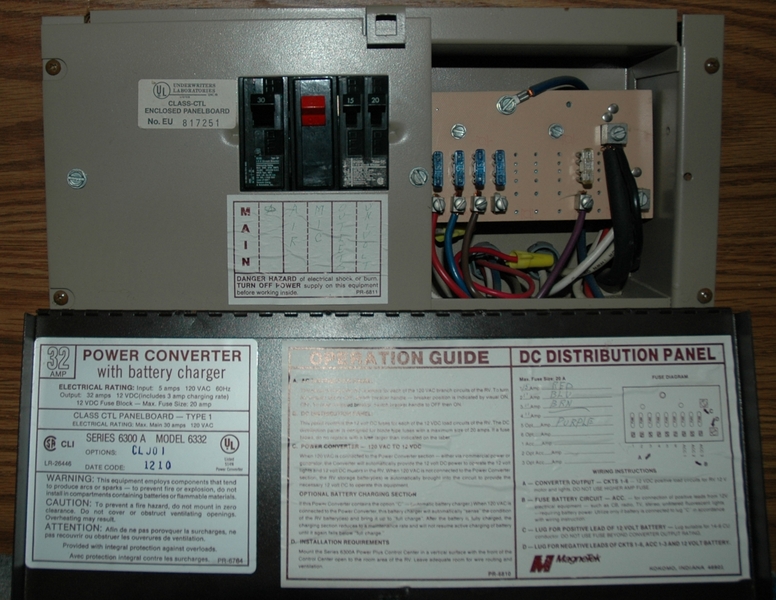
The first step was making sure the unit was unplugged, generator off, and the deep cycle battery disconnected. I flipped the breakers off for an extra measure of safety. Then I took the front cover of the power center off - four screws. I then cut the black and white 120 volt power wires (left side), and I disconnected the red, white, and blue 12 volt wires from the fuse panel (the loose wires are visible in the next picture). Note the blue wire is held on with a nut on the back of the fuse panel, so you'll have to remove it by taking out the two hex screws just below and on either side of the blue wire connection, then putting a wrench on the nut to hold it.

Remove the four screws on either side of the old converter's guts, and it should slide right out. My drill's battery was dead, so I wasn't able to drill out the rivets holding the converter's guts in place, so I turned to the fuse panel.
It's pretty straightforward - I removed each accessory wire (red, blue, brown, and purple, visible in the first picture) one at a time and attached it to the new fuse panel. Then I disconnected the large battery wire (along with a smaller black wire that's in the same terminal) on the top right, and the ground wire on the bottom right of the fuse panel (hidden in the picture). The old fuse panel should now be free to remove.
I attached the black wires to the "battery positive" terminals of the new fuse panel - this took some doing because the wire it too thick to be very flexible, and there's not enough extra length to come in from the top. I also connected the ground wire and screwed the new fuse panel in place.
I loaded the fuse panel with fuses - two 30 amp fuses where marked (I had some laying around from the air compressor), and I used the old 15 amp fuses to fill all circuits I'd put wires to. Note - in mine, the circuit on the right actually had a 25 amp fuse, but the new board has a limit of 20 amps in each of those positions. I put in a 15 amp fuse. This circuit contains the water pump, monitor panel, and 12 volt outlet, so 15 amps should be plenty, I think.
Next, I turned my attention to the 120 volt side. The new converter comes with a standard 15 amp 120 volt plug on the end of the cord, but the old one was hard wired. I removed the cover over the breakers, then removed the breakers (it's one of those "two breakers in the space one usually takes" setups) that had the connection for the converter. I disconnected the black wire for the converter from the breaker and the white wire from the neutral bus bar. Then I wired the black wire of the outlet (included in the kit) to the breaker, the white wire to the neutral bar, and the green wire to the ground bus bar.
I also took the opportunity to vacuum under there. It was pretty nasty.
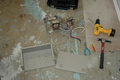
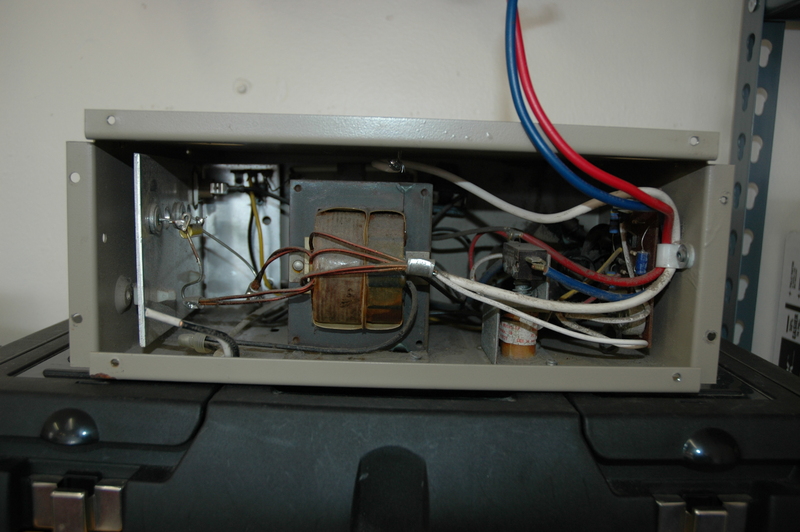
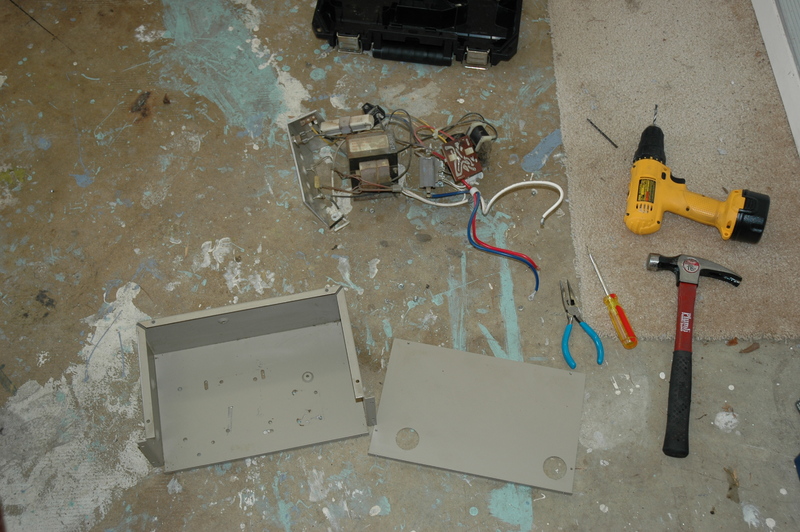
Finally the drill was charged. I first removed the cover of the box (four screws). Then, I used the drill to drill out the rivets of the converter box, then used a chisel (cleverly disguised as a screwdriver) and hammer to break things free. That was kind of fun to do, and as you can see in the next picture the guts came out pretty much in one piece. I also used Simple Green to clean up the metal case. I intend to steal the temperature sensor that triggers the fan before I toss the rest of the stuff - I bet I can find an interesting use for it.
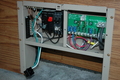
From there it was simply a matter of fitting in the new converter, marking the holes, drilling the holes, then running the supplied screws into them. Don't forget to plug in the Charge Wizard and you might as well hook up the 12 volt wires now (red to positive, white to negative) - it'll be a lot easier. Here's a shot of it fitted together, with the cover ready to go back on:
Note - the cover needs to go on with the screw holes above the top of the box, not below (see the picture of the old guts to see what I mean). I put the cover on upside down the first time and had to disconnect several wires and pull it back out to fix the problem. Also, the holes for the wires won't line up.
At this point, I was ready to put it all back together. Slide the box in, being careful to feed the outlet and wires through the holes. Hook the red wire to the top of the fuse panel where it says "Converter positive" and the white wire (negative) to the "Battery negative" terminal. Plug in the converter, turn on the breakers, plug in the camper, and verify the converter is producing voltage (since the battery is disconnected, if the 12 volt appliances work, the source of that power must be the converter). I checked the voltage and found it was 13.6 volts.
If you bought a new battery now is probably a good time to install it. Note if the battery is hooked up backwards, three fuses on the side of the converter will blow and will have to be replaced AFTER the connection is corrected.
At this point, I did a load test - I turned on every appliance and light I could and verified the voltage - the system voltage was 13.6 volts. Good. I switched off the breaker for the converter and the voltage dropped to 13.2 volts. Also good.
As you can see in the final picture, I routed the wire for the Charge Wizard out of the gap in the panel and attached it next to the power center (after cleaning the spot where I was going to attach it). The Charge Wizard's fast blinking indicates it's in "storage mode" which means that it's simply maintaining the battery, not trying to charge it. You can press the button to have it switch to boost mode but I don't think there's a reason to do that under normal conditions.

And that's it. This took me a total of probably 5 hours, but that included going to get new drill bits and buying the new battery, and it's really not that hard to do.
Note - I did not hook up the grounding lug, which I plan to do yet. However the converter is grounded via the fact that the metal converter case is connected to the metal box, which is itself grounded, so not having the ground connected isn't as bad as it would at first seem. But it really should be connected.
Update: I let the camper sit for a couple days, with the converter plugged in and turned on. It went into storage mode and was outputting 13.3 volts.
Here is the blinking of the charge wizard as I understand it - it may not be completely accurate; as I get more experience I'll update this:
* Occasional blink: storage mode (13.3 volts)
* Rapid blink: normal mode (13.6 volts)
* Slow blink: running off battery (whatever the battery is putting out)
* Solid: boosting battery (not sure of the voltage)
Update 2 (5/2/2008): I've used this on a camping trip now. Everything just seems to work better. For example, the lights are brighter. My florescent light no longer flickers maddeningly, something it has been doing since I bought the camper. The water heater seems to start more smoothly. The Fantastic Fan seems to run better. This was definitely worth the investment, and if it extends the life of the coach battery, in the long run it should actually save me money...
Update 3 (7/19/2008): I've used this on a couple trips now. Basically, the 60 amp model really is overkill - it's frequently in storage mode while I'm camping and using fans, lights, etc. But that's okay, because it means the converter isn't working very hard either, so it's not getting hot. I think the only time I've seen it in "Boost" mode is after using the coach battery to start the generator and having to do it many times before the generator started actually running.
Update 4 (12/28/2011): Although we sold the B190 a few months back, I was so happy with this converter that I put the exact same on in the new trailer.
After doing some research, I settled on the Progress Dynamics Inteli-Power 9200 series 60 amp converter model PD9260C. I ordered it from Best Converter because they (a) include the optional remote pendant, and (b) someone from the company has an Airstream himself and hangs out on the AIR Forums site providing advice, and in fact answered my question about whether this unit would fit in the original spot (it does, barely).
Note the original converter is 32 amps, and the new one is 60 amps. 60 amps is probably overkill for an RV the size of the B190 but I know I might be adding a number of 12-volt accessories later so I figured the extra headroom would be useful. Also I think the 60 amp unit actually fits better than the 45 amp unit would, because the 45 amp unit is taller. For the supply side of things, the 120 volt circuit the converter is on is rated for 20 amps, and the 60 amp converter won't use anywhere near that - at most it comes out to about 8 amps, and that's only if you're using 60 amps of DC power somehow.
Also, I ordered the fuse panel kit from Best Converter because the old fuse panel only filters the power for certain circuits, not all of them. Also, this would allow me to split things into multiple circuits more easily if I ever wish to (in particular, I'd like to run the radio and CB on their own circuit).
My new battery is an Optima Blue Top. I went with Optima because they have a pretty decent reputation, and because I wanted a sealed cell that required no maintenance, and because they were readily available locally.
On to the show. First, here's how it looked before I started:
 (Click on pictures for larger versions.)
And here's a shot of the new components:
The first step was making sure the unit was unplugged, generator off, and the deep cycle battery disconnected. I flipped the breakers off for an extra measure of safety. Then I took the front cover of the power center off - four screws. I then cut the black and white 120 volt power wires (left side), and I disconnected the red, white, and blue 12 volt wires from the fuse panel (the loose wires are visible in the next picture). Note the blue wire is held on with a nut on the back of the fuse panel, so you'll have to remove it by taking out the two hex screws just below and on either side of the blue wire connection, then putting a wrench on the nut to hold it.
Remove the four screws on either side of the old converter's guts, and it should slide right out. My drill's battery was dead, so I wasn't able to drill out the rivets holding the converter's guts in place, so I turned to the fuse panel.
It's pretty straightforward - I removed each accessory wire (red, blue, brown, and purple, visible in the first picture) one at a time and attached it to the new fuse panel. Then I disconnected the large battery wire (along with a smaller black wire that's in the same terminal) on the top right, and the ground wire on the bottom right of the fuse panel (hidden in the picture). The old fuse panel should now be free to remove.
I attached the black wires to the "battery positive" terminals of the new fuse panel - this took some doing because the wire it too thick to be very flexible, and there's not enough extra length to come in from the top. I also connected the ground wire and screwed the new fuse panel in place.
I loaded the fuse panel with fuses - two 30 amp fuses where marked (I had some laying around from the air compressor), and I used the old 15 amp fuses to fill all circuits I'd put wires to. Note - in mine, the circuit on the right actually had a 25 amp fuse, but the new board has a limit of 20 amps in each of those positions. I put in a 15 amp fuse. This circuit contains the water pump, monitor panel, and 12 volt outlet, so 15 amps should be plenty, I think.
Next, I turned my attention to the 120 volt side. The new converter comes with a standard 15 amp 120 volt plug on the end of the cord, but the old one was hard wired. I removed the cover over the breakers, then removed the breakers (it's one of those "two breakers in the space one usually takes" setups) that had the connection for the converter. I disconnected the black wire for the converter from the breaker and the white wire from the neutral bus bar. Then I wired the black wire of the outlet (included in the kit) to the breaker, the white wire to the neutral bar, and the green wire to the ground bus bar.
I also took the opportunity to vacuum under there. It was pretty nasty.
Finally the drill was charged. I first removed the cover of the box (four screws). Then, I used the drill to drill out the rivets of the converter box, then used a chisel (cleverly disguised as a screwdriver) and hammer to break things free. That was kind of fun to do, and as you can see in the next picture the guts came out pretty much in one piece. I also used Simple Green to clean up the metal case. I intend to steal the temperature sensor that triggers the fan before I toss the rest of the stuff - I bet I can find an interesting use for it.
From there it was simply a matter of fitting in the new converter, marking the holes, drilling the holes, then running the supplied screws into them. Don't forget to plug in the Charge Wizard and you might as well hook up the 12 volt wires now (red to positive, white to negative) - it'll be a lot easier. Here's a shot of it fitted together, with the cover ready to go back on:
Note - the cover needs to go on with the screw holes above the top of the box, not below (see the picture of the old guts to see what I mean). I put the cover on upside down the first time and had to disconnect several wires and pull it back out to fix the problem. Also, the holes for the wires won't line up.
At this point, I was ready to put it all back together. Slide the box in, being careful to feed the outlet and wires through the holes. Hook the red wire to the top of the fuse panel where it says "Converter positive" and the white wire (negative) to the "Battery negative" terminal. Plug in the converter, turn on the breakers, plug in the camper, and verify the converter is producing voltage (since the battery is disconnected, if the 12 volt appliances work, the source of that power must be the converter). I checked the voltage and found it was 13.6 volts.
If you bought a new battery now is probably a good time to install it. Note if the battery is hooked up backwards, three fuses on the side of the converter will blow and will have to be replaced AFTER the connection is corrected.
At this point, I did a load test - I turned on every appliance and light I could and verified the voltage - the system voltage was 13.6 volts. Good. I switched off the breaker for the converter and the voltage dropped to 13.2 volts. Also good.
As you can see in the final picture, I routed the wire for the Charge Wizard out of the gap in the panel and attached it next to the power center (after cleaning the spot where I was going to attach it). The Charge Wizard's fast blinking indicates it's in "storage mode" which means that it's simply maintaining the battery, not trying to charge it. You can press the button to have it switch to boost mode but I don't think there's a reason to do that under normal conditions.
And that's it. This took me a total of probably 5 hours, but that included going to get new drill bits and buying the new battery, and it's really not that hard to do.
Note - I did not hook up the grounding lug, which I plan to do yet. However the converter is grounded via the fact that the metal converter case is connected to the metal box, which is itself grounded, so not having the ground connected isn't as bad as it would at first seem. But it really should be connected.
Update: I let the camper sit for a couple days, with the converter plugged in and turned on. It went into storage mode and was outputting 13.3 volts.
Here is the blinking of the charge wizard as I understand it - it may not be completely accurate; as I get more experience I'll update this:
* Occasional blink: storage mode (13.3 volts)
* Rapid blink: normal mode (13.6 volts)
* Slow blink: running off battery (whatever the battery is putting out)
* Solid: boosting battery (not sure of the voltage)
Update 2 (5/2/2008): I've used this on a camping trip now. Everything just seems to work better. For example, the lights are brighter. My florescent light no longer flickers maddeningly, something it has been doing since I bought the camper. The water heater seems to start more smoothly. The Fantastic Fan seems to run better. This was definitely worth the investment, and if it extends the life of the coach battery, in the long run it should actually save me money...
Update 3 (7/19/2008): I've used this on a couple trips now. Basically, the 60 amp model really is overkill - it's frequently in storage mode while I'm camping and using fans, lights, etc. But that's okay, because it means the converter isn't working very hard either, so it's not getting hot. I think the only time I've seen it in "Boost" mode is after using the coach battery to start the generator and having to do it many times before the generator started actually running.
Update 4 (12/28/2011): Although we sold the B190 a few months back, I was so happy with this converter that I put the exact same on in the new trailer.