Page 1 of 1
Power Cord Conversion....
Posted: Fri Aug 31, 2012 8:57 am
by Wakeslayer
Hey all,
After having our Bus out a couple times, I decided I didn't like the cord that gets stuffed up under the tub and pulled through the side of the rig to get to power.
outside receptacle.jpg
After finding the previous thread about converting to shore power set up as more modern RV's have, as well as boats. Alaskan was kind enough to confirm the electrical parts I needed and also, even moreso, fabbed up a cover/mounting plate for me to use. You need to make the plate to cover up a couple of the previous holes from the access cover. The new Marinco one is a different shape and not quite big enough.
The process is actually pretty straightforward.
Pull the cord out and cut off, leaving enough to allow you to work with it (I left about 16 inches)
Strip back about six inches of the outer sheath leaving three wires, then strip back about 5/8" down to the wire to attach to the plug.
Remove the old housing by taking out the three screws. I had to scrape some old silicone from behind the old housing.
cleaned and drilled.jpg
^^Note the above pic shows four 3/8" holes. I will get to that in a minute.^^
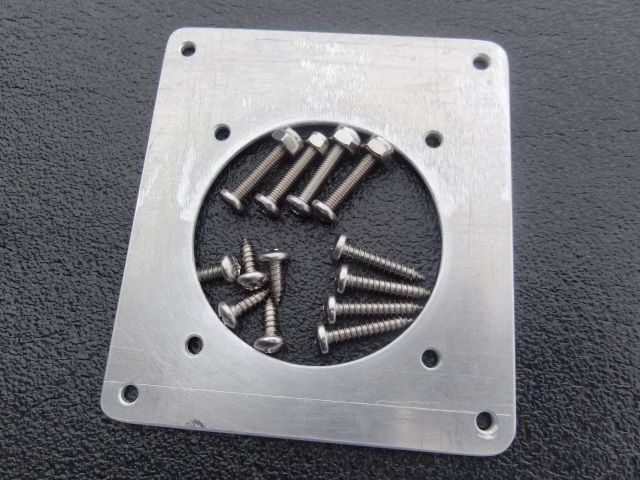
I then began the assembly of the outlet. Slip the pieces onto the cable in the following order: Adapter plate, back of housing, running three wires through the strain relief, rubber gasket, then the actual outlet. The back of the Marinco unit is color coded to where the wires go. Impossible to get wrong. I used #8 stainless machine screws and nylock nuts to hold all of this together. The biggest pain in the rear to this hole process was drilling the four larger holes for the nuts to go through the body of the van. (See above pic) I got one off center and it all went a little awry from there. Of course I would do a far better job the second time around....
assembly 001.jpg
Re: Shore Power conversion
Posted: Fri Aug 31, 2012 9:07 am
by Wakeslayer
After finally getting the holes for the backing nuts large enough, we were on the home stretch. I had my son hold the plate super tight. Drilled the four mounting screw holes through body. I then taped off around the unit so I could use some sealer behind it for water protection. Unfortunately, I had forgotten to buy 3M 5200, so I reverted to some at least good quality clear, outdoor silicone sealer I had on hand. I absolutely hate silicone, but I was stuck and needed to get this done.
sealing 001.jpg
I ran a decent sized bead of silicone around the perimeter of that backing plate, around the screw holes, and then a bit more around the inner edges. Pressed it down super hard, and ran in the #10 1 inch stainless mounting screws. One screw gor hung up on something, but after determining it was nothing critical I drove it home. Another screw snapped the head off. This was a pain in the ass. Unable to get to it I decided to try and drill it out. The drill went off to the side a tad. I elected to just run the new screw right there and it worked. I gave it fifteen minutes and removed the tape.
finsihed.jpg
Here is the inside now. No pile of wadded up cable. I still need to get under here and tack the wire up and really out of the way. It was about 95* when I did this project so I hung it up at that point.
finsihed inside 001.jpg
Re: Shore Power conversion
Posted: Fri Aug 31, 2012 9:12 am
by Wakeslayer
Lastly, here is the converter plug that you need to go from 30A gen, to 30A RV plug cable
30A converter.jpg
Hope this helps anyone who wishes to do this conversion. Big props and thanks to Alaskan Dave for his assistance and the adapter plate!!!!!
Get on the Bus!
Mike
PS: What is the deal with my photos. I sized them the same as I do on any other forums and the require scrolling. What size should they be formatted at?
PPS: I went and found in the FAQ to have pics at 640x480, I edited my first post to those sizes and still require scrolling. Just not as much. HELP!!!
Re: Shore Power conversion
Posted: Fri Aug 31, 2012 9:22 am
by skater
Nice job!
Wakeslayer wrote:
PS: What is the deal with my photos. I sized them the same as I do on any other forums and the require scrolling. What size should they be formatted at?
It's a forum feature to keep the page from getting messed up. If you click on the photo it should expand to full size.
Re: Shore Power conversion
Posted: Fri Aug 31, 2012 11:09 am
by Wakeslayer
Got it. Thanks!!
I should also mention that as Alaskan had posted in the rain gutter post, I used Krylon 51318 gray primer, and then Krylon 51301 clear acrylic to finish the backing plate. Worked great and looks good I think.
Shore Power conversion
Posted: Fri Aug 31, 2012 11:28 am
by Keystone
Wow! I want one, too. Looks really great. Thanks for posting the details. What are the specs of the adapter plate?
Keystone
Re: Shore Power conversion
Posted: Fri Aug 31, 2012 11:38 am
by Wakeslayer
Keystone,
Thanks!! I am so happy with it.
I will go measure the plate exactly during lunch. It is slight taller than wide due to the lid flipping up.
Re: Shore Power conversion
Posted: Fri Aug 31, 2012 12:45 pm
by Wakeslayer
This task probably took less than two hours start to finish, not including wait for the paint to dry.
Here is a BOM list for this project:
Marinco Park Power Outlet
30A adapter plug
Aluminum backing plate 1/8" thick 4 7/16" wide 4 7/8" tall with a 2 7/8" hole in center offset 1/2" low
qty=4 #8 stainless machine screw w/ 4 washers and 4 nylock nuts 1 1/4" (maybe 1" would work)
qty=4 #10 stainless pan head screw 3/4" ( I used 1")
small tube of silicone or 3M 5200
I would recommend using the actual Marinco outlet as the template for the mounting holes for it. Drill the large hole and the 4 outer holes. Then once you have the outlet, drill the other four inner mounting holes.
Rough up the outside, and use Krylon gray primer 51318, and then topcoat that with Krylon 51301 clear.
As Alaskan Dave helped me out, I would be glad to do the same and pay it forward. Let me know if you want me to get a plate together for you. For that matter, I have the paint too and could do that for you, as well.
You will need: screw gun, 1/8" drill bit, 3/8" drill bit, wire cutters and strippers, phillips driver, 11/32" wrench (I think)
Shore Power conversion
Posted: Fri Aug 31, 2012 11:28 pm
by Keystone
Thanks, Wakeslayer! I just ordered the Marinco parts for the conversion. I accept your kind offer of an adapter plate if it's not too much trouble. That plate is the key to this project, and it's not something I can make myself. I'll send you a pm after I'm back from this weekend's camping trip with details. -Keystone
Re: Shore Power conversion
Posted: Sat Sep 01, 2012 12:37 am
by Alaskan
Thanks Mike for the write-up.....looks like it came out good
I just knew I should have made a couple extra of those adapter plates...  I did however make a pattern before I mailed that one off to Mike...
Re: Power Cord Conversion....
Posted: Sat Jul 13, 2013 3:42 pm
by Keystone
Finally installed my new ac power connector today--the adhesive is curing as I write this. Huge thanks to Alaskan Dave for the nifty adaptor plate with stainless fasteners and to Wakeslayer Mike for the detailed instructions with photos. Now, at last, we can access shore and campground power without taking off the bikes/bikerack. And I love that the Marinco bayonet fitting is both secure and waterproof. Could not have accomplished this project without you guys. These little project successes that add modern conveniences will keep our van fun to travel in for years to come. Thanks a million! Watch for a snap of the finished installation in my gallery sometime after the adhesive is fully dry. -Keystone
Re: Power Cord Conversion....
Posted: Sun Jul 14, 2013 10:48 am
by Alaskan
Glad to be of assistance....

